Tuesday, October 21, 2014

Pa-pa-pa Pants Fi-fi-fi Fitting!

As I continue along my sewing journey I've discovered a few fitting techniques that have worked for my figure. Up to this point I have been pretty pleased with the outcome of the projects I have undertaken, but now it is time to take on a new challenge.  Pants!

I've heard that achieving a great fitting pair of pants can be frustrating.  In fact, many sewists tend to shy away from sewing pants. The actual construction is, for the most part, pretty straightforward once you know how to insert a zipper. However, getting pants to fit properly is an entirely different matter.

A few years ago I tried altering a pants pattern to fit but after several frustrating hours and unsuccessful muslins I gave up.  Since then I have been doing my research, consulting various fitting resources and experimenting with pattern alterations.  I now have the courage to give it another try.

I admit that I am feeling a little apprehensive but alas I will press forward and begin the process.

I will also attempt to share my experience as I work toward achieving a my goal-- the good, the bad and the ugly.  But of course I'm hoping it's all good!   

Stay tuned...


Until next time...Sew something you love!

Sunday, September 21, 2014

I Got It Done!

I finished the quilt!  I can't believe it. Not only did I finish it but I did so a few days ahead of schedule.

We had the pleasure of spending time with our daughter today. We left early this morning and drove three plus hours to visit our daughter for family weekend. I tried really hard to surprise my daughter with the finished quilt but was so excited and when she asked me by phone if the quilt was finished with such expectancy in her voice I couldn't lie and answered her with a resounding YES!!!

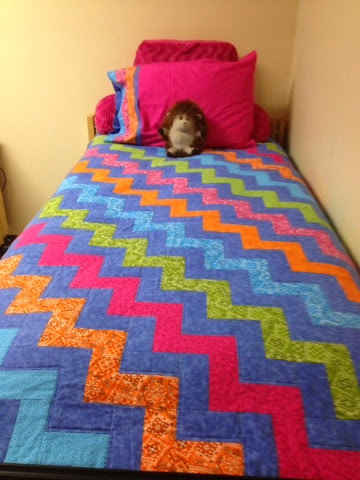
So this morning when we arrived earlier than she'd expected and I presented her with the quilt we rushed straight up to her room, apologized to her roommate for being so loud and giddy early in the morning (it was 11:00 am but we are talking about college kids here), and spread the newly finished quilt on her bed.  It was a perfect fit!  All of my hard work was rewarded with the biggest grin and many many hugs and kisses. And the cherry on top was a pillowcase made with some of the leftover quilt fabric. 

Some pics...


The rug doesn't quite work with the colors in the quilt so We will be looking for an orange one to replace it. 

So as I sit here typing this post, I find myself feeling a little sad.  I've spent the last few weeks working on this quilt and now that it is finished I actually miss it.  You see, while I was sewing the quilt I thought about how happy my daughter would be when she saw it for the first time.   I thought about all the love that went into the very first quilt I made from start to finish and how I have given her a little part of me to keep with her while she is away at school and then later as she establishes her own household and family.  

Now I know why quilters love what they do. Quilting is stitching little pieces of love into someone's life.

Until next time...Sew something you love!
Wednesday, September 10, 2014

Many Distractions But Making Progress

These past few weeks have been filled with fun distractions.  Hubby and I celebrated 25 years of marriage.  We have been enjoying our empty nest although I do find myself missing having the kids around.  But I have plenty of projects to take my mind off of missing my kids.

I have started getting more use of my Cricut Expressions Die Cut Machine that, until recently, was only put to use when one of the kids had a school project.  Now I'm discovering yet another craft that I enjoy-- card making. Unfortunately, when I get excited about a new project I find it difficult to stay motivated to complete older projects.  That means that some of the time I could have spent sewing and completing works in progress has been spent on new sewing projects and  other crafts.

If you have been following this blog you know that I promised my daughter a quilt to take to college. It was supposed to be completed this summer but other things got in the way. To force myself to keep working on the quilt I have set a deadline of completing the quilt in time to take it to her on Family Weekend in a few weeks.  Problem is, other projects have been "jumping in the way".

Like this pillowcase I made for my son's girlfriend who recently lost a family member --
There is a great tutorial that show how to make a pillowcase using the burrito technique.  The wonderful thing about this technique is there are no raw edges showing on the wrong side.  I found the main fabric on the red tag bin at Joann's.  It is a cotton flannel.  I had enough of the fabric to  make two pillowcases.  The music and rose motif has special meaning to the recipient of these pillowcases. 

And these greeting cards--

But despite all the happy distractions I still managed to make significant progress on the quilt...


AND I found this fabric for the backing.  It was on sale at Joann's.  I like that it contains most of the colors that are in the quilt top and it has happy words like "sing", "create", "imagine" and "play" printed throughout.  I think this is perfect for my college-age daughter.  I hope she likes it. 

Currently I am in search of an area that is large enough to lay out the entire quilt in order to take measurements for the border.  After that comes cutting out and piecing the border and the quilt back, sewing on the border.  Then, of course, is sandwiching the entire thing together and machine quilting it on my home sewing machine.  I am not afraid to admit that I am extremely intimidated. I am not a quilter and this is my first major quilting project!  Why oh why did I decide to make a xl twin quilt?!

Oh well, it's only sewing-- right???   

...gulp!!!
 

Until next time...Sew something you love!

Monday, August 25, 2014

A Maxi Dress - Finally!

I do not consider myself to be one that has to have the newest gadget release, wear this season's latest fashions, or follow the latest trends.  So I did not jump on the maxi dress bandwagon a few years ago when almost every woman I saw was wearing some form of maxi dress or skirt.  Don't get me wrong-- I like the idea of a dress that covers up from shoulder to ankle but I  had not come across a dress in a style AND print I liked.  However, I discovered this ITY print on sale at fabricmartfabrics.com. When I opened the package and shook out the fabric for the first time it screamed:  "I WANT TO BE A MAXI DRESS!!!"

Here it is--- my completed MAGAM Challenge project for August...


I will admit that I was not in love with this print until I saw it made up.  I am really digging this print in this pattern!

This was a very quick sew as there were only two pattern pieces. I did apply a binding to the neckline.  The armholes were finished by pressing a 5/8" hem and sewing with a coverstitch machine. I also discovered this FBA tutorial for knits.  I really like the fact that by using this method the bust dart that usually results when making a full bust adjustment is eliminated.  No bust darts and no fabric folds extending from but to armscye-- woo hoo!!! 

Looks like I will have to make a bolero style jacket ina coordinating fabric so that I can enjoy wearing this maxi dress into the fall before it gets too cold.

And now back to the college quilt. I have got to stop proscrastinating. I would like to finish it before my daughter graduates from college in four years.  I just can't seem to stay focused on one craft these days!  Oh well...

Until next time...Sew something you love!

Wednesday, August 20, 2014

The End of Summer Already?!

This has been a whirlwind of a summer!  With sending a freshman off to college, several trips to campus and transitioning to empty nesters, this summer has been a bittersweet, fun and exciting time!  I can't believe Labor Day is just around the corner which for me signals the end of summer sewing-- boo hoo!

I enjoy sewing summer clothes. Short sleeves, or in many cases, sleeveless tops and dresses in ITY knits are my garments of choice.  Why?  Because they are quick to sew, knits are more forgiving where fitting is involved, and I am still somewhat intimidated by altering sleeves to fit my full arms.

So here is the garment I am planning for my August MAGAM Challenge.
With the end of the month quickly approaching, I need to take a short break from college quilt sewing to work on McCall's 6559.  The plan is to have it done in time to wear it to the local sewing meetup this Saturday.  Since I work full time that means only three evenings left to get it done.

Time to get busy!

Until next time...Sew something you love!

Thursday, July 31, 2014

Performing A Full Bust Adjustment On An Empire Waist

My MAGAM project for July is Simplicity 1916. I have sewn different versions of this pattern and although it was wearable I noticed wrinkles that indicated improper fit.  This time I thought that a FBA might improve the fit so I set off to figure out how to do one with this style pattern. I think I got it right and I am pleased with the result.  I am shariing  what I did and I hope that my experience might  help someone else who is considering this pattern or a similar style.  

I made a version of view F which is a wrap front bodice with an empire waist.  There is a front band that is gathered at center front and a sash with a rosette embellishment but I decided against the sash and rosette because I thought it looked funny (think  neck tie that only reaches mid belly).  The gathers in the center front band made the band look to short so I pulled out the gathering stitches and chose instead to leave the band flat.  I also lengthened the top since I'd planned to wear it with capris.

Here is the finished garment.


The FBA

1.  Mark the bodice in preparation for FBA. 
I found the position of my bust point and then drew a line parallel to the grainline up to the bust point. Then I drew two more lines--one from the bust point to the armhole and one from the bust point to the side seam below the notch.  Note: I use this method to find my bust point-- pin pattern front and back together at the shoulders. Try on pattern making sure shoulder seam is in the correct position on my shoulder and then line up the center front of the pattern to my center front and mark the apex of my bust.  Caveat: I am not an expert.  This method has worked for me. You may find a different method that works better for you. 

2.  Slash and spread the amount needed for adjustment. In this case I found that I needed to add 1 1/2 inches to the bust after comparing my measurements to the finished measurements so I spread the the pattern 3/4 inch (1 1/2 inches divided by 2).


3.  Slash the pattern on the line at the side seam (red) and spread until the space measures 3/4 inch the entire length from the bust point to the lower edge. The dart that results will be rotated out at the pleats.  Draw another line from the point of the new bust dart to the closest pleat (blue line). 


4.  Cut along blue line up to the dart point, but not through.  Then rotate the dart closed. The dart has now been rotated into the pleat (see where the pen is pointing?)  Stay with me now...


5.  Now tape some paper to the lower edge, fold and pin the pleats in place as directed on the pattern and draw a new cutting line to mimic the original cutting line at the lower edge.
6.  Then unfold the pleats and extend the solid lines and the dotted lines (yellow).   Now extend the newly drawn cutting lines until they intersect the solid or dotted lines (I forgot to take a picture of this step before trimming away the excess paper).  You should notice that the newly drawn lower cutting line follows the original cutting lines but more length and width has been added to the pleat at center front. Now cut off the excess paper and you should get something like this


7.  Measure the amount added to the bodice to determine the amount to add to the lower front piece.
Since the bodice front alterations were located between the notch and the center front the extra width needed was added to the lower front between the notch and the center front that will be gathered).  


8.  Draw a line parallel to the grainline and cut along this line.  I also draw a few horizontal lines to use as reference points to make sure everything lines up later. 


9.  Then slash and spread the pattern apart by the same amount that was added to this bodice (in this case 1/2 + 3/4 = 1 1/4 inches).  
I also added 2 inches to the overall length so I could wear this top with capris. Extra length in my opinion is more pleasing proportionately. 

10. Don't forget to add to the front band.  I added 1 1/4 inches to each side of the center front since the front band is not cut on the fold. 


I hope this all makes sense and you find this information helpful.


Until next time...Sew something you love!

Sunday, July 27, 2014

A Quick Update

Here is a quick update of what I have been working on...


Knitting mojo has returned-- well, almost. I finished my hat...


I altered a pattern for my July garment for the MAGAM Challenge. Here is the pattern and fabric. I    will provide more details in a later post. 


Been working on other crafts not related to sewing or knitting but need to get cranking on this so that my daughter can take it to college in the fall. I know what I will be doing for the next few weeks!


Until next time...Sew something you love!


Tuesday, July 15, 2014

Outside of My Comfort Zone Yet Again

"You made that?!"

       "Wow, that looks like you brought it from a store!"

               "You should start your own sewing and alterations business!"

I hear this a lot.  Although I am flattered and greatly appreciate the compliments I often wonder if I would enjoy sewing for others as much as I have enjoyed sewing for  myself and my daughter.

I sew for myself because I get frustrated trying to find ready to wear clothes to fit me. I have spent hours in a dressing room only to come out empty handed and feeling down on myself because my body did not fit the clothes.  Sewing for myself has taught me that the clothes need to fit MY body, not the other way around. 

I sew for my daughter because it saves money ( think prom dress).

I have been asked if I sew for hire. My answer has been no until recently when a friend of mine asked me if I would make a strapless dress for her to wear while she was on vacation.  At first I refused but after she begged and pleaded I reluctantly gave in on the condition that she understood that I am waaaay out of my comfort zone and would not make any guarantees regarding the outcome of the finished garment; and that she agreed to allow me to take pictures and post them on my blog and in a pattern review.  

Knowing this she still wanted me to sew the dress and was more than willing to be my "guinea pig" (her words).   

I started by tracing off the pattern in the size needed.  I made a muslin and did the needed adjustments (while holding my breath and praying that they would work). After several hours of pattern alterations and sewing I am happy to report that she loved the dress and I even enjoyed the process. 

I doubt that I will ever sew for hire but I might not mind occasionally for others-- on my terms of course!

Here is the finished garment modeled by the recipient. 


Now back to my regularly scheduled sewing.

Until next time...Sew something you love.

Friday, July 4, 2014

On Becoming An Empty Nester-- Earlier Than Expected

If you have been following this blog you know that my youngest graduated this year. I had planned to spend this summer preparing to send her off to college.  We had planned to enjoy lots of mother-daughter time over the next few months. However, just before graduation, we received notice that my baby girl had been selected for a by invitation only opportunity that her father and I felt she could not turn down. So we had to rush to get her everything she needed for college a few months earlier than we thought and we had only a short time in which to do it.  So here we are-- empty nesters months before we'd planned.


Fast forward to June 24--

As we said our goodbyes outside of the dorm of the university that would be my daughter's home for the next 4 years, I thought about the wonderful journey ahead of her as she begins this new phase of her life and I couldn't help but smile. We'd done it-- successfully launched our last baby bird from the nest and she was soaring!


I must confess, a few days later I found myself missing having teenagers in the house but then my husband and I realized that we could have a conversation without being interrupted, we didn't have to cook if we didn't feel like it opting instead to go out to eat, and we had more time for each other and for our respective hobbies and interests!


Parrrrrrrrrty! Whoop! Whoop!  

Then it actually occurred to me that what I'd been dreaming about was becoming a reality.  I'd have more time to spend in the Sewing Sanctuary!  More time to explore new hobbies and interests. More time to reconnect with friends!  More ME time!


So here are some of the things I am planning to do now that both kids are in college and I have more free time to explore--


1.  Learn hand embroidery to become more comfortable with and proficient in handsewing. 

Signed up for Design It, Stitch It: Hand Embroidery class through craftsy.com and gathered/purchased these class materials


2.  Work on daughter's quilt for college

Began sewing blocks together. May have bitten off more than I can chew-lol!

4.  Find my knitting mojo so that I can put the "knit" back in MsKnitSew.

Cast on a hat back in January 2013.  It has been languishing among several other unfinished projects as a result of a lost knitting mojo. I picked it up again this weekend to pass the time while traveling with my husband who has returned to coaching (a passion of his).  I had a lot of time to myself while he was meeting with the team and the other coaches.  Managed to knit quite a few rows. I am currently working on decreasing for the crown and may even have pics of the finished project in the next post.


5.  Start a Smash Book

While shopping at a local thrift store I came across a sealed bag of craft supplies that I thought would come in handy and at less than $7.00 for the whole bundle I couldn't pass it up.  When I got it home and began looking through the contents of the bag I discovered this

I had never heard of these products so I did a web search and discovered another hobby that I might enjoy.  So naturally I had to investigate further. Off to Joann's (with a coupon, ahem, just in case) where I found and purchased this


It's been a little over a week and I think this empty nest phase might actually turn out to be kinda fun.


Until next time...Sew (or knit) something you love!


Monday, June 30, 2014

MAGAM Challenge For June Complete!


You may recall from this post that I had to make a full bust adjustment to accommodate my larger than a B-cup bust. All went well-- for the most part.  I noticed that the center front was waaaay lower than the back and sides at the hemline.  Hmmmm.  I rechecked my adjustments.  Everything looked okay.  Then I realized that the hemline was somewhat rounded as opposed to a hem that you would find on a straight skirt so when I lowered the center front to even out hem (standard procedure when performing a FBA) I did not compensate for the roundness at the hemline-- I think?

If anyone out there can suggest an easy pattern adjustment/correction to fix this, please let me know by leaving a comment.   I would like to try this pattern in the dress length.  For the current version I turned up a deeper hem at the center front tapering back to the original hem depth at the sides.  I then trimmed the hem to the original hem depth of 1 1/4 inch.

And here it is...


I love the center front gathered detail. The top is very flattering and the neckline is not too low.   AND as an added bonus this blouse incorporates two of my favorite things-- ITY knit and animal print! 

Until next time...Sew something you love!


Tuesday, June 17, 2014

Sewing Sanctuary Restored!


I am almost finished with my June MAGAM garment and will hopefully have pics of the finished project very soon.


Clean up Is Complete

I have been cleaning my sewing room over the past two weekends and I am happy (okay ECSTATIC) to say it is done!  There is still some fine tuning to be done like organizing patterns but I can move around without shifting things out of the way or tripping over things.


The chaotic cave has been restored to a sewing sanctuary.  Yeah!


Here is a view of inside the craft cabinet (behind full length mirror) and a close up of the bookcase. 


Cutting table is loaded with goodies-- more about these in a future blog post. I'm so excited!!!


Found these nifty shelves at a local Big Lots.  They are designed for kitchen shelves but they slide onto the cutting table for additional storage-- a perfect solution to my problem.  Now I can free up the table surface for easier pattern lay out. 


Coverstitch machine and serger setup.  Replaced the table lamps with clip on lamps to free up desk space.  Will work on a solution to hide the wires. 


Found a bag full of serger thread for about $8 at a local thrift store about a year ago. Still have room for a few more cones but don't think I will need any more any time soon.


My church was throwing away this table.  I brought it home, reconfigured it so that my sewing machine would sit flush with the table top, then covered it with a fabric remnant and clear vinyl.  The extension pole storage (see the bottom of this post) was another thrift store find.


Every morning before work I go I to my sewing sanctuary. Seeing It brings sunshine to my day.


Now the challenge is keeping it that way...


Until next time...Sew something you love!

Sunday, June 8, 2014

A Journey from Chaotic Cave To Sewing Sanctuary


I find it funny that I never notice the chaos in the sewing sanctuary until it gets to this point--


You see, I have a really bad habit of sewing and not putting things away after I'm finished. I'm like a kid looking through the toy box to find a favorite toy.  Everything in the way gets tossed here and there and everywhere. 

I have every intent to return the scissors or the  seam ripper or the seam gauge to it's designated spot when I'm done using it. I also intend to fold those pattern pieces and return them to the proper envelope. I try really hard to throw away the thread tails as I clip them.  However, despite my best intentions I find myself turning in circles in the middle of my sewing room wondering how and when it went from sewing sanctuary to chaotic cave.  

This weekend I began process of restoring peace in the sanctuary.  

 Here is what I have done so far--


I have been trying to figure out a way to create more leg room and make my serger (middle machine) level with the table top without cutting a hole into the top of the desk. After realizing I had some room on either side of my table set-up I slid the desk and the drawers apart so that there was about 18 inches of space in between them. 

I went to the hardware store and had them cut two 18 inch pieces (the depth of the chest of drawers and desk) from a 1 x 2 wood plank and screwed one onto the side of the desk and the chest of drawers. I determined that my serger bed was 4 inches  from the top of the table, plus the 1 inch depth of the 1x2 equals 5 inches so I placed the 1  x 2 's about 5 inches down from the top of each piece of furniture and  parallel to the floor to make what I think are called braces but I am not a woodworker.   I made sure each brace was level and at the same height so that the new "table top" would be level. Then I took a piece of 1-inch thick 18 by 18 board (also cut to size at the hardware store) and layed it across the braces. Presto-- additional space for my serger. I used Velcro to keep the board from sliding on the braces.  I did not screw the board to the braces in order to make it easier to disassemble and move if I ever decide to rearrange the sewing sanctuary. 

To fill in the space between the serger and the old desktop I used a 2 foot by 2 foot piece of styrofoam insulation and instructions from the book by Marguerita McManus entitled Sew and Quilt in Comfort to make a serger insert. I covered the insert with same shelf paper.

Here is a closer look--

.


This freed up the top of the drawer and made space for a small ironing center.

I can't wait to sew on my serger now that I have more flatbed space. 

I still have quite a ways to go in order to transform the chaotic cave back into the sewing sanctuary but I think I'm off to a good start. 


Until next time...Sew something you love. 


Thursday, May 29, 2014

Burda 6974 - Applying What I Learned About Full Bust Adjustments


I began this blog as an attempt to share what I've "figured out" in hopes that it might help someone else, but I also hope to learn from the experience of others.  Most of what I have learned about pattern alterations has been obtained from scouring books on fitting, other blogs, YouTube videos and online courses.  I have had many successes but I have also had a few duds along the way.


I have had my eye on Burda 6974 as my MAGAM project for June. I have, however, been somewhat reluctant to sew it because I knew I needed a FBA and did not see where anyone else had demonstrated this alteration on this particular pattern.


So here goes my attempt at a full bust adjustment on Burda 6974--


1.  I drew a new grainline parallel to the center fold which is on the straight of grain.


2.  I marked my bust point and drew two more lines-- one from the armhole to the bust point and one  from just below the armhole to the bust point. 


3. I made the full bust adjustment (I will not go into details here as there are a number of excellent tutorials on the internet). 
4.  I did not want a dart at the side seam so I decided to rotate the dart out at center front. To rotate  the dart, I drew another line from a point along the gathering to the bust point and pivoted the side seam dart closed.  This converted the dart to gathers at the center front. 


Here is how the pattern looks after the alterations described above.


And a closer look at the rotated dart adjustment. Again, this will not be sewn as a dart, but will be gathered.


5.  I made the corresponding adjustment to the front facing by lining it up with the top  I realized too late that I'd made the adjustments with the right side of the pattern facing down, which explains the backwards print. 

Will this alteration give me the fit I desire?  I won't know until I sew a test garment but the way I see it-- Nothing beats a failure but a try. 


So if all goes well, here is the plan for my MAGAM project for June.

I purchased this fabric on sale from an internet source (can't remember which one at the moment). After I received it in the mail I found that I didn't like it as much as I thought I would. So my June project will be a test garment of sorts. If it works, I will be able to wear it in the summer and with a cardigan in cooler months. If it does not work out there will be no love lost. The plan is to make the top but without sleeves (fitting set-in sleeves for me is a major alteration which I have not yet mastered).  I hope I will have good news to report. 

Until next time...Sew something you love!