Showing posts with label MAGAM. Show all posts

Thursday, July 31, 2014

Performing A Full Bust Adjustment On An Empire Waist

My MAGAM project for July is Simplicity 1916. I have sewn different versions of this pattern and although it was wearable I noticed wrinkles that indicated improper fit.  This time I thought that a FBA might improve the fit so I set off to figure out how to do one with this style pattern. I think I got it right and I am pleased with the result.  I am shariing  what I did and I hope that my experience might  help someone else who is considering this pattern or a similar style.  

I made a version of view F which is a wrap front bodice with an empire waist.  There is a front band that is gathered at center front and a sash with a rosette embellishment but I decided against the sash and rosette because I thought it looked funny (think  neck tie that only reaches mid belly).  The gathers in the center front band made the band look to short so I pulled out the gathering stitches and chose instead to leave the band flat.  I also lengthened the top since I'd planned to wear it with capris.

Here is the finished garment.


The FBA

1.  Mark the bodice in preparation for FBA. 
I found the position of my bust point and then drew a line parallel to the grainline up to the bust point. Then I drew two more lines--one from the bust point to the armhole and one from the bust point to the side seam below the notch.  Note: I use this method to find my bust point-- pin pattern front and back together at the shoulders. Try on pattern making sure shoulder seam is in the correct position on my shoulder and then line up the center front of the pattern to my center front and mark the apex of my bust.  Caveat: I am not an expert.  This method has worked for me. You may find a different method that works better for you. 

2.  Slash and spread the amount needed for adjustment. In this case I found that I needed to add 1 1/2 inches to the bust after comparing my measurements to the finished measurements so I spread the the pattern 3/4 inch (1 1/2 inches divided by 2).


3.  Slash the pattern on the line at the side seam (red) and spread until the space measures 3/4 inch the entire length from the bust point to the lower edge. The dart that results will be rotated out at the pleats.  Draw another line from the point of the new bust dart to the closest pleat (blue line). 


4.  Cut along blue line up to the dart point, but not through.  Then rotate the dart closed. The dart has now been rotated into the pleat (see where the pen is pointing?)  Stay with me now...


5.  Now tape some paper to the lower edge, fold and pin the pleats in place as directed on the pattern and draw a new cutting line to mimic the original cutting line at the lower edge.
6.  Then unfold the pleats and extend the solid lines and the dotted lines (yellow).   Now extend the newly drawn cutting lines until they intersect the solid or dotted lines (I forgot to take a picture of this step before trimming away the excess paper).  You should notice that the newly drawn lower cutting line follows the original cutting lines but more length and width has been added to the pleat at center front. Now cut off the excess paper and you should get something like this


7.  Measure the amount added to the bodice to determine the amount to add to the lower front piece.
Since the bodice front alterations were located between the notch and the center front the extra width needed was added to the lower front between the notch and the center front that will be gathered).  


8.  Draw a line parallel to the grainline and cut along this line.  I also draw a few horizontal lines to use as reference points to make sure everything lines up later. 


9.  Then slash and spread the pattern apart by the same amount that was added to this bodice (in this case 1/2 + 3/4 = 1 1/4 inches).  
I also added 2 inches to the overall length so I could wear this top with capris. Extra length in my opinion is more pleasing proportionately. 

10. Don't forget to add to the front band.  I added 1 1/4 inches to each side of the center front since the front band is not cut on the fold. 


I hope this all makes sense and you find this information helpful.


Until next time...Sew something you love!

Sunday, July 27, 2014

A Quick Update

Here is a quick update of what I have been working on...


Knitting mojo has returned-- well, almost. I finished my hat...


I altered a pattern for my July garment for the MAGAM Challenge. Here is the pattern and fabric. I    will provide more details in a later post. 


Been working on other crafts not related to sewing or knitting but need to get cranking on this so that my daughter can take it to college in the fall. I know what I will be doing for the next few weeks!


Until next time...Sew something you love!


Sunday, May 25, 2014

LBD Vogue 8724 Finished!

MAGAM Challenge For May Is Finished

It's back to sewing for myself again and I completed my Make A Garment A Month Challenge for May.

I made Vogue 8724 about a year ago. This time I tweaked the fit a little more. This pattern is part of Vogue's Custom Fit  Pattern Collection. The great thing about Custom Fit is there are individual pattern pieces for cup sizes A, B, C and D . This means a better fit for those of us who need  a full bust adjustment, without the extra work involved in making this alteration.


The first time I sewed this pattern using the C cup pattern piece. I sewed it in a solid brown ITY knit. It fit okay but as I learned more about proper fit I noticed the bodice pulled too much across the bust.


I'd  previously measured my high bust and my full bust and got a 3 inch difference (or so I thought) so I chose the C cup. However, after noticing the pulls, I whipped out my tape measure again and noted that there is actually a 4 inch difference between my high bust and my full bust!  

No problem!  I cut out the D cup and made up the pattern. This time there was little or no pulling.


Can you see the difference between the fit of the C cup (brown) and the D cup (black)?

I also noticed that I didn't feel the need to readjust the neckline or look down to make sure the girls were not attempting an escape.


Time to plan for MAGAM for June.  I have a few garments in mind but more on that in a future post.


Another Thrift Store Find


I found this during my last trip to the thrift store.  I paid 6 cents!  I think this is the waxed tracing paper which will come in handy when making muslins. The markings should show up much better. 

Have a safe and happy Memorial Day Weekend!

Until next time...Sew something you love!


Thursday, May 22, 2014

MAGAM Challenge

Challenge Accepted!

While web surfing I came across this site and after reading the challenge rules, decided to take the plunge.  I have joined the Make A Garment A Month Challenge, also known by the acronym MAGAM. 

I'm a little late out of the shoot for May due to prom sewing and graduation sewing.  Since it looks like I will have very little time to sew for myself I decided to make this pattern by Vogue.

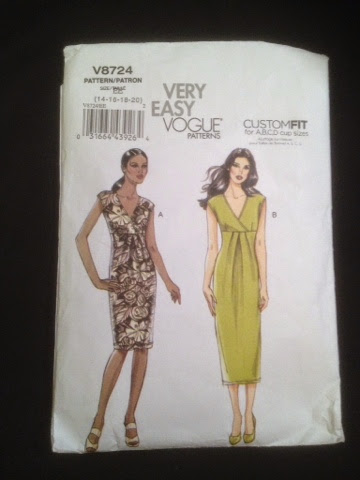
Vogue 8724

It is a Vogue CustomFit pattern which means that there is a separate front bodice piece for each cup size.  I am planning to make view A which looks to be just about mid-knee length.  I will be making it out of some black ITY knit that I currently have  in my stash.  I chose this pattern because it is a Very Easy Vogue Pattern, it takes less than 2 yards of fabric, is a quick sew and the dress is very flattering.  Besides, a woman can always use a little black dress right?

I'm looking for a pattern for the month of June. Perhaps a pair of pants?

Until next time...Sew something you love.