Thursday, May 29, 2014

Burda 6974 - Applying What I Learned About Full Bust Adjustments


I began this blog as an attempt to share what I've "figured out" in hopes that it might help someone else, but I also hope to learn from the experience of others.  Most of what I have learned about pattern alterations has been obtained from scouring books on fitting, other blogs, YouTube videos and online courses.  I have had many successes but I have also had a few duds along the way.


I have had my eye on Burda 6974 as my MAGAM project for June. I have, however, been somewhat reluctant to sew it because I knew I needed a FBA and did not see where anyone else had demonstrated this alteration on this particular pattern.


So here goes my attempt at a full bust adjustment on Burda 6974--


1.  I drew a new grainline parallel to the center fold which is on the straight of grain.


2.  I marked my bust point and drew two more lines-- one from the armhole to the bust point and one  from just below the armhole to the bust point. 


3. I made the full bust adjustment (I will not go into details here as there are a number of excellent tutorials on the internet). 
4.  I did not want a dart at the side seam so I decided to rotate the dart out at center front. To rotate  the dart, I drew another line from a point along the gathering to the bust point and pivoted the side seam dart closed.  This converted the dart to gathers at the center front. 


Here is how the pattern looks after the alterations described above.


And a closer look at the rotated dart adjustment. Again, this will not be sewn as a dart, but will be gathered.


5.  I made the corresponding adjustment to the front facing by lining it up with the top  I realized too late that I'd made the adjustments with the right side of the pattern facing down, which explains the backwards print. 

Will this alteration give me the fit I desire?  I won't know until I sew a test garment but the way I see it-- Nothing beats a failure but a try. 


So if all goes well, here is the plan for my MAGAM project for June.

I purchased this fabric on sale from an internet source (can't remember which one at the moment). After I received it in the mail I found that I didn't like it as much as I thought I would. So my June project will be a test garment of sorts. If it works, I will be able to wear it in the summer and with a cardigan in cooler months. If it does not work out there will be no love lost. The plan is to make the top but without sleeves (fitting set-in sleeves for me is a major alteration which I have not yet mastered).  I hope I will have good news to report. 

Until next time...Sew something you love!

Sunday, May 25, 2014

LBD Vogue 8724 Finished!

MAGAM Challenge For May Is Finished

It's back to sewing for myself again and I completed my Make A Garment A Month Challenge for May.

I made Vogue 8724 about a year ago. This time I tweaked the fit a little more. This pattern is part of Vogue's Custom Fit  Pattern Collection. The great thing about Custom Fit is there are individual pattern pieces for cup sizes A, B, C and D . This means a better fit for those of us who need  a full bust adjustment, without the extra work involved in making this alteration.


The first time I sewed this pattern using the C cup pattern piece. I sewed it in a solid brown ITY knit. It fit okay but as I learned more about proper fit I noticed the bodice pulled too much across the bust.


I'd  previously measured my high bust and my full bust and got a 3 inch difference (or so I thought) so I chose the C cup. However, after noticing the pulls, I whipped out my tape measure again and noted that there is actually a 4 inch difference between my high bust and my full bust!  

No problem!  I cut out the D cup and made up the pattern. This time there was little or no pulling.


Can you see the difference between the fit of the C cup (brown) and the D cup (black)?

I also noticed that I didn't feel the need to readjust the neckline or look down to make sure the girls were not attempting an escape.


Time to plan for MAGAM for June.  I have a few garments in mind but more on that in a future post.


Another Thrift Store Find


I found this during my last trip to the thrift store.  I paid 6 cents!  I think this is the waxed tracing paper which will come in handy when making muslins. The markings should show up much better. 

Have a safe and happy Memorial Day Weekend!

Until next time...Sew something you love!


Thursday, May 22, 2014

MAGAM Challenge

Challenge Accepted!

While web surfing I came across this site and after reading the challenge rules, decided to take the plunge.  I have joined the Make A Garment A Month Challenge, also known by the acronym MAGAM. 

I'm a little late out of the shoot for May due to prom sewing and graduation sewing.  Since it looks like I will have very little time to sew for myself I decided to make this pattern by Vogue.

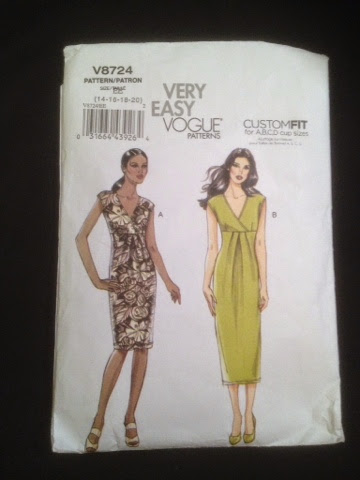
Vogue 8724

It is a Vogue CustomFit pattern which means that there is a separate front bodice piece for each cup size.  I am planning to make view A which looks to be just about mid-knee length.  I will be making it out of some black ITY knit that I currently have  in my stash.  I chose this pattern because it is a Very Easy Vogue Pattern, it takes less than 2 yards of fabric, is a quick sew and the dress is very flattering.  Besides, a woman can always use a little black dress right?

I'm looking for a pattern for the month of June. Perhaps a pair of pants?

Until next time...Sew something you love. 

Sunday, May 18, 2014

Vogue 1393 - Don't Let The Simple Lines Fool Ya

If you have been following my blog post you will know that I have been sewing for my daughter-- first the prom, then graduation. I HATE DEADLINE SEWING!!!

I finished her prom dress with 30 minutes left to spare. Well, this time as soon as I sewed the last stitch and did a final press, my daughter put on the dress and left for her Senior Banquet.  Whew!!!

So here it is
This pattern was not difficult to sew but it was very time consuming. I am not a fast sewer to begin with. I pin everything and if pins aren't sufficient while machine sewing, I will hand-baste to hold things in place.  In this case, I hand-basted the underlining to it's corresponding lace-- all 12 pieces!

The neckline and the armholes are finished using bias binding cut from the fabric (I used white crepe) and the lace portions that aren't underlined are sewn together using French seams. Each underlined tier is edgestitched. 

By the time I was done with this dress I felt like I had sewn 4 dresses instead of one.

Now that the deadline sewing is done what do I sew next?  Hmmm, I'm sure I will think of something.

Until next time...Sew something you love!


Thursday, May 15, 2014

Vogue 1393 Progress

An Update

Progress on Vogue 1393 is going well so far.  I sewed a muslin of the bodice and it fit my daughter perfectly, right out of the pattern envelope.  However, I did not make a muslin of the skirt but checked the fit by tissue fitting the skirt lining.  I sure hope that I don't regret skimping on this part.


I have all of the underlining pieces cut out and all but two of the lace pieces cut out.


An underlining is cut from the same pattern piece as the fashion fabric, then the two are hand-basted together and treated as one unit during the rest of the garment construction.  In this case I used crepe back satin to underline lace fabric.


Problem #1

How to keep things organized so that I would not be playing the matching game when it came time to baste the underlining to the matching lace piece and then reattach it to the correct pattern piece for the purposes of transferring pattern markings.


Solution

Realizing that I would need to reuse the same pattern pieces to cut out the lace fabric I decided to layout the pattern on the lace while the underling was still attached, but without actually pinning the pattern to the lace at this point. After ensuring that I had the correct layout and enough fabric, I removed the pattern from each underlining piece a few at a time, carefully setting aside the underlining. Then I pinned these pattern pieces to the lace using pins that would not snag the fabric and cut out the lace a few pieces at a time. After cutting out the lace piece, I immediately pinned it to its corresponding underlining and basted the two together.


Problem #2

How to properly align the lace to its corresponding underlining and baste them together without shifting.


My first thought was to baste around the circumference in either a clockwise or counterclockwise direction. However, in doing so I noticed that because the crepe back satin was so "wiggly" (how's that for a technical term) that the fabric shifted.  By the time I got around to the point where I'd started basting, the underlining had shifted so much that it no longer appeared to match the corresponding lace piece.


Solution:


To cut down on shifting while basting the underlining to the lace I followed this sequence:

  1. Hand-baste the two shorter sides matching the raw edges.
  2. Then gently maneuver the underlining to match the raw edges on the remaining sides and baste.


Look at the photo below--


The raw edges of the  underlining and the lace have been matched and basted together along the right edge.  Notice how the remaining sides are not lining up?
 

After matching and basting together the raw edges along the opposite side, then matching and basting together the remaining two raw edges...


Voila! An exact match!


Problem #3

How to properly realign and pin the pattern back to the now underlined lace piece so that the pattern markings can be transferred? 


Solution:

I very carefully realigned the two underlining/lace units, or re-folded the units that were cut on the fold, matching the raw edges and pinning them together to make sure everything aligned properly.


And flipped it over to double check the alignment 


Then pinned the pattern piece in place. Note:  you may want to use a lot of pins around the perimeter to keep the pattern from shifting as you transfer the markings. 


Sometimes, even with my best effort, the pattern and fabric did not match perfectly (usually as a result of less than precise cutting).  In those cases I trimmed away any excess fabric.  Then,  I clipped the notches and thread marked the dots, darts, and any other necessary pattern markings.  

What has been your experience with underlining?  Do you have any hints or tips to share? If so, please share by leaving a comment.  

And until next time...Sew something you love!