Sunday, September 21, 2014

I Got It Done!

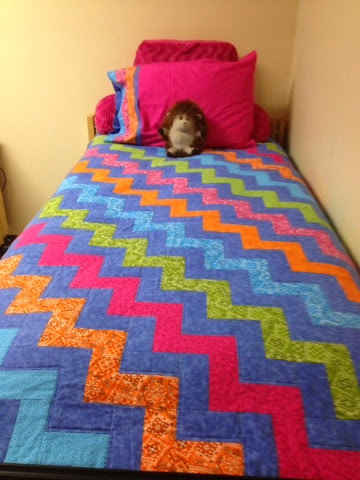
I finished the quilt!  I can't believe it. Not only did I finish it but I did so a few days ahead of schedule.

We had the pleasure of spending time with our daughter today. We left early this morning and drove three plus hours to visit our daughter for family weekend. I tried really hard to surprise my daughter with the finished quilt but was so excited and when she asked me by phone if the quilt was finished with such expectancy in her voice I couldn't lie and answered her with a resounding YES!!!

So this morning when we arrived earlier than she'd expected and I presented her with the quilt we rushed straight up to her room, apologized to her roommate for being so loud and giddy early in the morning (it was 11:00 am but we are talking about college kids here), and spread the newly finished quilt on her bed.  It was a perfect fit!  All of my hard work was rewarded with the biggest grin and many many hugs and kisses. And the cherry on top was a pillowcase made with some of the leftover quilt fabric. 

Some pics...


The rug doesn't quite work with the colors in the quilt so We will be looking for an orange one to replace it. 

So as I sit here typing this post, I find myself feeling a little sad.  I've spent the last few weeks working on this quilt and now that it is finished I actually miss it.  You see, while I was sewing the quilt I thought about how happy my daughter would be when she saw it for the first time.   I thought about all the love that went into the very first quilt I made from start to finish and how I have given her a little part of me to keep with her while she is away at school and then later as she establishes her own household and family.  

Now I know why quilters love what they do. Quilting is stitching little pieces of love into someone's life.

Until next time...Sew something you love!

Wednesday, September 10, 2014

Many Distractions But Making Progress

These past few weeks have been filled with fun distractions.  Hubby and I celebrated 25 years of marriage.  We have been enjoying our empty nest although I do find myself missing having the kids around.  But I have plenty of projects to take my mind off of missing my kids.

I have started getting more use of my Cricut Expressions Die Cut Machine that, until recently, was only put to use when one of the kids had a school project.  Now I'm discovering yet another craft that I enjoy-- card making. Unfortunately, when I get excited about a new project I find it difficult to stay motivated to complete older projects.  That means that some of the time I could have spent sewing and completing works in progress has been spent on new sewing projects and  other crafts.

If you have been following this blog you know that I promised my daughter a quilt to take to college. It was supposed to be completed this summer but other things got in the way. To force myself to keep working on the quilt I have set a deadline of completing the quilt in time to take it to her on Family Weekend in a few weeks.  Problem is, other projects have been "jumping in the way".

Like this pillowcase I made for my son's girlfriend who recently lost a family member --
There is a great tutorial that show how to make a pillowcase using the burrito technique.  The wonderful thing about this technique is there are no raw edges showing on the wrong side.  I found the main fabric on the red tag bin at Joann's.  It is a cotton flannel.  I had enough of the fabric to  make two pillowcases.  The music and rose motif has special meaning to the recipient of these pillowcases. 

And these greeting cards--

But despite all the happy distractions I still managed to make significant progress on the quilt...


AND I found this fabric for the backing.  It was on sale at Joann's.  I like that it contains most of the colors that are in the quilt top and it has happy words like "sing", "create", "imagine" and "play" printed throughout.  I think this is perfect for my college-age daughter.  I hope she likes it. 

Currently I am in search of an area that is large enough to lay out the entire quilt in order to take measurements for the border.  After that comes cutting out and piecing the border and the quilt back, sewing on the border.  Then, of course, is sandwiching the entire thing together and machine quilting it on my home sewing machine.  I am not afraid to admit that I am extremely intimidated. I am not a quilter and this is my first major quilting project!  Why oh why did I decide to make a xl twin quilt?!

Oh well, it's only sewing-- right???   

...gulp!!!
 

Until next time...Sew something you love!
Monday, August 25, 2014

A Maxi Dress - Finally!

I do not consider myself to be one that has to have the newest gadget release, wear this season's latest fashions, or follow the latest trends.  So I did not jump on the maxi dress bandwagon a few years ago when almost every woman I saw was wearing some form of maxi dress or skirt.  Don't get me wrong-- I like the idea of a dress that covers up from shoulder to ankle but I  had not come across a dress in a style AND print I liked.  However, I discovered this ITY print on sale at fabricmartfabrics.com. When I opened the package and shook out the fabric for the first time it screamed:  "I WANT TO BE A MAXI DRESS!!!"

Here it is--- my completed MAGAM Challenge project for August...


I will admit that I was not in love with this print until I saw it made up.  I am really digging this print in this pattern!

This was a very quick sew as there were only two pattern pieces. I did apply a binding to the neckline.  The armholes were finished by pressing a 5/8" hem and sewing with a coverstitch machine. I also discovered this FBA tutorial for knits.  I really like the fact that by using this method the bust dart that usually results when making a full bust adjustment is eliminated.  No bust darts and no fabric folds extending from but to armscye-- woo hoo!!! 

Looks like I will have to make a bolero style jacket ina coordinating fabric so that I can enjoy wearing this maxi dress into the fall before it gets too cold.

And now back to the college quilt. I have got to stop proscrastinating. I would like to finish it before my daughter graduates from college in four years.  I just can't seem to stay focused on one craft these days!  Oh well...

Until next time...Sew something you love!

Wednesday, August 20, 2014

The End of Summer Already?!

This has been a whirlwind of a summer!  With sending a freshman off to college, several trips to campus and transitioning to empty nesters, this summer has been a bittersweet, fun and exciting time!  I can't believe Labor Day is just around the corner which for me signals the end of summer sewing-- boo hoo!

I enjoy sewing summer clothes. Short sleeves, or in many cases, sleeveless tops and dresses in ITY knits are my garments of choice.  Why?  Because they are quick to sew, knits are more forgiving where fitting is involved, and I am still somewhat intimidated by altering sleeves to fit my full arms.

So here is the garment I am planning for my August MAGAM Challenge.
With the end of the month quickly approaching, I need to take a short break from college quilt sewing to work on McCall's 6559.  The plan is to have it done in time to wear it to the local sewing meetup this Saturday.  Since I work full time that means only three evenings left to get it done.

Time to get busy!

Until next time...Sew something you love!

Thursday, July 31, 2014

Performing A Full Bust Adjustment On An Empire Waist

My MAGAM project for July is Simplicity 1916. I have sewn different versions of this pattern and although it was wearable I noticed wrinkles that indicated improper fit.  This time I thought that a FBA might improve the fit so I set off to figure out how to do one with this style pattern. I think I got it right and I am pleased with the result.  I am shariing  what I did and I hope that my experience might  help someone else who is considering this pattern or a similar style.  

I made a version of view F which is a wrap front bodice with an empire waist.  There is a front band that is gathered at center front and a sash with a rosette embellishment but I decided against the sash and rosette because I thought it looked funny (think  neck tie that only reaches mid belly).  The gathers in the center front band made the band look to short so I pulled out the gathering stitches and chose instead to leave the band flat.  I also lengthened the top since I'd planned to wear it with capris.

Here is the finished garment.


The FBA

1.  Mark the bodice in preparation for FBA. 
I found the position of my bust point and then drew a line parallel to the grainline up to the bust point. Then I drew two more lines--one from the bust point to the armhole and one from the bust point to the side seam below the notch.  Note: I use this method to find my bust point-- pin pattern front and back together at the shoulders. Try on pattern making sure shoulder seam is in the correct position on my shoulder and then line up the center front of the pattern to my center front and mark the apex of my bust.  Caveat: I am not an expert.  This method has worked for me. You may find a different method that works better for you. 

2.  Slash and spread the amount needed for adjustment. In this case I found that I needed to add 1 1/2 inches to the bust after comparing my measurements to the finished measurements so I spread the the pattern 3/4 inch (1 1/2 inches divided by 2).


3.  Slash the pattern on the line at the side seam (red) and spread until the space measures 3/4 inch the entire length from the bust point to the lower edge. The dart that results will be rotated out at the pleats.  Draw another line from the point of the new bust dart to the closest pleat (blue line). 


4.  Cut along blue line up to the dart point, but not through.  Then rotate the dart closed. The dart has now been rotated into the pleat (see where the pen is pointing?)  Stay with me now...


5.  Now tape some paper to the lower edge, fold and pin the pleats in place as directed on the pattern and draw a new cutting line to mimic the original cutting line at the lower edge.
6.  Then unfold the pleats and extend the solid lines and the dotted lines (yellow).   Now extend the newly drawn cutting lines until they intersect the solid or dotted lines (I forgot to take a picture of this step before trimming away the excess paper).  You should notice that the newly drawn lower cutting line follows the original cutting lines but more length and width has been added to the pleat at center front. Now cut off the excess paper and you should get something like this


7.  Measure the amount added to the bodice to determine the amount to add to the lower front piece.
Since the bodice front alterations were located between the notch and the center front the extra width needed was added to the lower front between the notch and the center front that will be gathered).  


8.  Draw a line parallel to the grainline and cut along this line.  I also draw a few horizontal lines to use as reference points to make sure everything lines up later. 


9.  Then slash and spread the pattern apart by the same amount that was added to this bodice (in this case 1/2 + 3/4 = 1 1/4 inches).  
I also added 2 inches to the overall length so I could wear this top with capris. Extra length in my opinion is more pleasing proportionately. 

10. Don't forget to add to the front band.  I added 1 1/4 inches to each side of the center front since the front band is not cut on the fold. 


I hope this all makes sense and you find this information helpful.


Until next time...Sew something you love!